Monday, 10 October 2011

Chinese Food Time 2--Mongolian Beef !

Prep Time: 30 minutes

Prep Time: 30 minutes

Cook Time: 10 minutes

Total Time: 40 minutes

Ingredients:

  • 1 lb sirloin or flank steak
  • Marinade:
  • 1 egg white
  • Pinch of salt
  • 1 teaspoon sesame oil
  • 1 tablespoon cornstarch
  • Vegetables:
  • 4 green onions, sliced on the diagonal into 1-inch pieces
  • 1 8-ounce can baby corn
  • 1 garlic clove, minced
  • Sauce:
  • 3 TB hoisin sauce
  • 2 TB water 
  • 1 TB dark soy sauce
  • 2 tsp rice vinegar, or 1 tablespoon Chinese rice wine or dry sherry
  • 1/4 tsp chile paste, or to taste 
  • Other:
  • 1 tsp sugar
  • 1 cup oil for frying beef
  • 2 TB oil for stir-frying

Preparation:

Slice the beef across the grain into thin strips. Add the marinade ingredients in the order given and marinate the beef for thirty minutes.  To prepare the vegetables, wash the green onions and slice on the diagonal into 1-inch pieces. Peel and mince the garlic. Rinse the can of baby corn with warm running water. Drain thoroughly. Mix together the sauce ingredients and set aside.
  When the beef has finished marinating, heat the wok and add 1 cup oil. When oil is ready, add the beef and fry until it changes color. Remove the beef from the wok and drain on paper towels.
  Clean out the wok with a paper towel, and add 2 tablespoons of oil for stir-frying. When the oil is ready, add the garlic. Stir-fry briefly, and add the baby corn. Add the green onions.
    Make a well in the middle of the wok by pushing the vegetables up to the side. Add the sauce and bring to a boil, stirring to thicken. Stir in the sugar. Add the beef and combine with the sauce and vegetables. Serve hot.

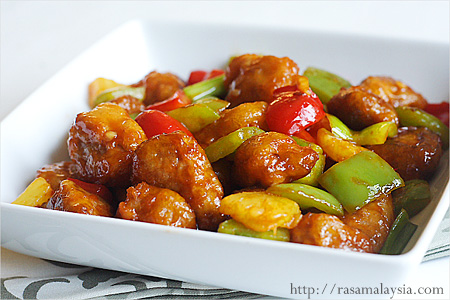
Chinese Food Time-- Sweet sour Pork !

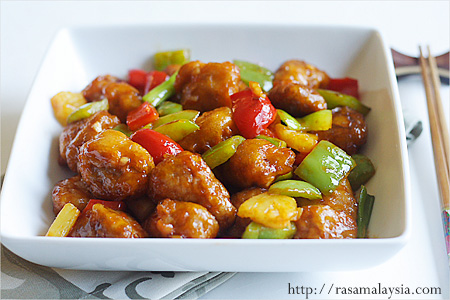
Sweet and Sour Pork
 
Sweet and Sour Pork is one of the popular Chinese food.The ubiquitous and arguably the most well-known Chinese recipe in the world, is a classic Cantonese dish. Called “咕嚕肉” or “goo lou yok” in Cantonese dialect, sweet and sour pork is very pleasing to the palate because of the flavorsome sweet and sour sauce–the sweetness from sugar plus the tangy ketchup and sharp rice vinegar–with the crispy fried pork pieces. The green and red bell peppers and pineapple pieces are just icing on the cake.
The secret of an authentic sweet and sour pork dish lies in the perfect balance of the sweet vs. sour taste of the sauce. To master this dish, it’s not about the technique of stir-frying nor the use of the freshest ingredients, although both are equally important and wouldn’t hurt. To me, the sweet and sour sauce is the soul of this dish. If you fail the sweet and sour sauce, you fail the dish. With that in mind, I will teach you how to make that perfect sweet and sour sauce and share with you the secret ingredients I use…(get sweet and sour pork recipe after the jump)

Sweet and Sour Pork
While traditional Chinese/Cantonese sweet and sour pork recipe calls for the use of rice vinegar and ketchup to bring out the sour taste, I also use plum sauce to add some extra zing, plus a few dashes of Lea & Perrins Worcestershire Sauce and oyster sauce to complete a harmony balance. They are my secret ingredients and do make a nice difference in terms of taste, in my honest opinion.
Other than the sauce, the frying batter is no less important. A great batter recipe promises crispy and crunchy coating for the pork. In my recipe below, you will also find the instructions and exact measurement to make the batter. It is simply awesome!
Sweet and Sour Pork
Rasa Malaysia’s Secret Ingredients for Sweet and Sour Pork:
  1. Plum Sauce
  2. Lea & Perrins Worcestershire Sauce
  3. Oyster Sauce (my not-so-secret seasoning medium)
So, discard the canned pineapple juice or orange juice in the Americanized sweet and sour pork recipe. Do try out my secret ingredients above the next time you prepare sweet and sour pork.
Anyway, once you master the techniques of making sweet and sour sauce, you can pretty much whip up any sweet and sour dishes in a jiffy: pork, chicken, fish, or shrimp...Enjoy it if you make successful sweet sour pork !!


Sweet and Sour Pork


Read More : http://rasamalaysia.com/chinese-food-recipes-chinese-recipes/

Sunday, 9 October 2011

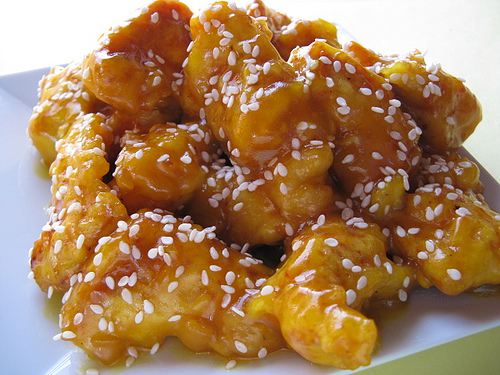
HONEY FRIED CHICKEN =)


Most of the honey chicken at the buffets I find a little too sweet for my liking. I decided I wanted to give it a try at home and came across a recipe that looked pretty good, and indeed it was. Basically this is no different than any other Chinese chicken recipe. The chicken is first battered, deep fried and then coated with a thick sauce. You can use a wok but I really recommend deep frying the chicken bits when using a batter like this. The sauce is a delicious mixture of honey, garlic, and ginger and rice vinegar. Serve with white rice. Enjoy.

Ingredients:1 ½ lbs boneless skinless chicken breasts (cut into 1” chunks)
Oil (for deep frying)
Batter-
4 tablespoons cornstarch
¼ cup flour
1 teaspoon baking powder
½ cup water
½ teaspoon salt
1 egg
1 egg white
Sauce-1 ½ tablespoons oil
2 teaspoon ginger (minced)
3 tablespoons garlic (minced)
1 teaspoon salt
3 tablespoons honey
1 teaspoon rice wine vinegar
½ cup water
1 teaspoon cornstarch (mixed with 1 teaspoon water)
Sesame seeds (for garnish)


Cooking Instructions:


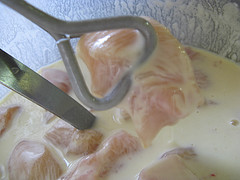
Step 1: In a large bowl mix all batter ingredients together until smooth. Cover and allow the batter to site for at least 30 minutes. Add the chicken to the batter tossing to coat.
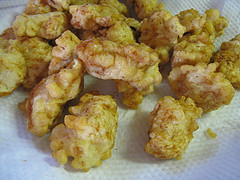
Step 2: Heat a deep fryer to 350 degrees. Fry chicken bits in patches for 2 minutes or until batter becomes firm. Drain on paper towels.

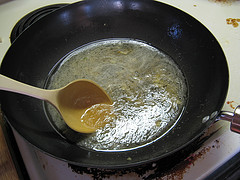
Step 3: To make the sauce. Heat 1 ½ tablespoons of oil in your wok. Add garlic and ginger and stir fry for 30 seconds.  Add salt, honey, vinegar, and water. Mix well. Combine 1 teaspoon of water with 1 teaspoon of cornstarch. Add to the sauce and Simmer for 2 minutes.
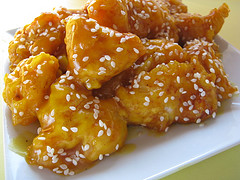
Step 4: Coat chicken with the sauce and garnish with sesame seeds. Serve with white rice.
(Makes 4 servings)


Read more:  http://www.honeychickenrecipe.com.au/

How to Make Kung Pao Chicken


First we will make the marinade for the chicken. add a little bit of white wine, soy sauce, sesame oil, cornstarch, and water and mix it all together. When the mixture is done, add in the chicken and toss it so all the chicken gets evenly coated. Let the chicken sit in the marinade for about half an hour.
Now it's time to make the sauce for the Kung Pao Chicken. Add in all the ingredients for the marinade as well as chile paste, vinegar, and sugar. Also, add in the chopped vegetables, the peanuts, and the pineapples. Then, get a frying pan, or wok if you have one, on medium-low heat and cook the sauce until it starts to thicken.
While you are making the sauce, take the chicken out of the marinade and cook it in a frying pan until the meat is white. Once the chicken looks like it is done, add the sauce to the chicken and fry it all together.
When you are done, you will get a very aromatic chicken dish that almost everyone will enjoy. As always, there are many different variations of how to make kung pao chicken, and it's all up to you to determine what will taste the best.
TVLesson.com is a community educational based for all users. Variety of different how to lessons can be searched in more than 14 different categories. We welcome our users to register and join the TV Lesson community so they can help us develop and fine tune the TV Lesson experience to the community's needs. Join us and share your own wisdom and know-how by uploading your videos. Many lessons can be found in variety of channels. Sharing lessons can be a great way to connect in community and to increase knowledge. All lessons are carefully hand-selected and filtered to provide the best instructional videos.
Are you getting tired of searching for free video tutorials online? Now you can find all lessons in just one place. Explore our largest video library collection of free how-to videos.

Are you getting tired of searching for free video tutorials online? Now you can find all lessons in just one place. Explore our largest video library collection of free how-to videos.

Read More:  http://www.bing.com/images/search?q=How+to+make+kong+pao+chicken+&view=detail&id=7E281DACD4AABA48A80D5267DD23D6EBDD5CCFDC&first=0&FORM=IDFRIR

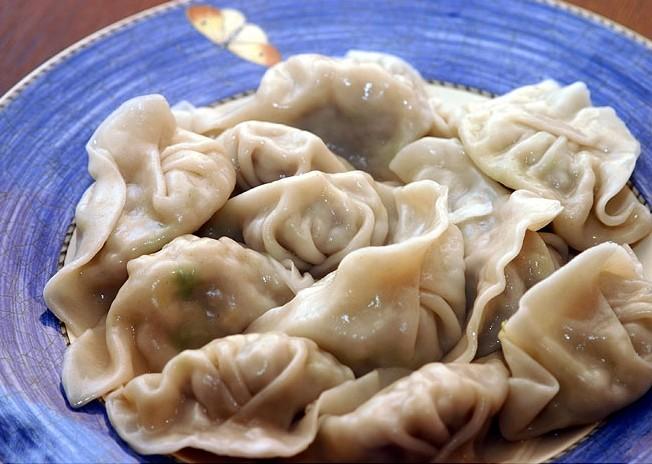
Try Chinese dumplings !

How to make Chinese dumplings?  

     To make Chinese dumplings, first of all, chop the meat into pieces and mash them, then add salt, sesame oil, soy sauce, ginger, scallions, Chinese cabbage and MSG if you like. Mix thoroughly the ingredients; add two spoonful of water if necessary.
In a big bowl, add water to flour gradually. Mix and knead by hand to form soft dough, then cover it with towel and put it aside for about an hour. Then scatter some dry flour on the board, knead and roll it into a sausage---like dough about 5 centimeters in diameter, then chop it into small pieces. Press each piece with your hand and get a pancake. Finally, to hold the pancake with your palm and put the filling in the center and wrap into half-moon shaped and seal the edges.
The next step is easy. Put the dumpling into boiling water, when it is well cooked, it is ready to be served. Before eating, you need to prepare some small dishes to contain the mixture of soy sauce, vinegar, and sesame oil or pepper oil [to your own taste.


Details of making Chinese dumplings:Recipes
I have put together a list of recipes of Chinese dumpling.

Filling:
*1 lb. ground pork (or beef)
*6 T. sesame oil
*2 t. sugar
*0.75 t. salt
*0.25 t. pepper
*0.25 lb. cabbage
*1 t. salt
*0.25 lb. chopped green onions
Skin:
*3 c. flour
*0.75 c. cold water
*0.5 c. flour (to prevent sticking during kneading)
soy sauce
water
vinegar (white or rice)
garlic (fresh, chopped fine, or powdered)
ginger (fresh, chopped fine, or powdered)
small bowl with water for dipping

Details of making Chinese dumplings1. Filling: Mix ground pork, oil, sugar, chop cabbagesalt and pepper until fine. Let sit for 10 minutes; then squeeze out the excess water.
2. Skin: In a bowl, add water to the flour and knead into smooth dough; let it stand for 10 minutes. Roll the dough into a long baton-like roll and cut it into 50 pieces. Use a rolling pin to roll each piece to a thin circle.
3. Combine: Place 1 portion of filling in the center of a dough circle. Fold the circle in half and moisten the edges with water. Use index finger and thumb to bring the sides together. The smooth edge will conform to the decreased length of the pleated edge. Pinch the pleats together then pinch to seal. Place the dumpling on a floured tray and repeat this with the remaining dumplings.
4. Boil: Boil 10 cups of water and add dumplings; gently stir to prevent dumplings from sticking together. Bring to a boil; turn the heat to low and cook for three minutes. When serving, use vinegar, soy sauce, sesame oil, hot bean paste, etc. as dipping sauces.
5. Serving: Serve the dumplings hot (if you cook them in bamboo baskets you may wish to serve them from it directly at the table) with bowls of soy sauce mixed with red wine vinegar.


Read More : http://www.beijingservice.com/beijinghighlights/dumpling.htm

Let'sa try to make a Sushi !

Sushi is both delicious and healthy, making it a favorite of food lovers everywhere. The only draw back is that a full sushi dinner at a restaurant can often be very expensive. If you love sushi, but don't want to spend a fortune, you can try your hand at making sushi at home. The steps are easy to follow, and suitable for chefs of any skill level. Your favorite sushi rolls can be customized to include your favorite ingredients, and be suited to your taste. Read on to learn how to make sushi.


                     Before You Begin Making Sushi
  • First, you'll want to decide what type of sushi you want to make. There are several distinctive varieties, these include:
  • Nigiri-zushi: bundles of rice, topped with wasabi and fish. Once served, nigiri should be taken by the fingers and dipped fish-side only into soy sauce.
  • Sashimi: simply raw fish, sliced thinly, served without rice. Sashimi can consist of salmon, squid, or other fresh seafood.
  • Chirashi-zushi: prepared in a bowl, with several different kinds of fish and vegetables mixed in with rice. This dish can be compared to a salad.
  • Oshizushi: (literally means "pressed sushi") is made by layering the ingredients on top of rice in a wooden mold, known as an Oshizushi-Bako.
  • Maki-zushi: rice and seafood, rolled up in nori seaweed. This is the most popular variety of sushi in America, and the type of sushi detailed in the steps below.
                                             What You'll Need To Make Sushi
 
       Ingredients:
  • Sushi or Sashimi-Grade Fish
    • Despite popular belief, there is no official definition for the term "sushi-grade", as the Food and Drug Administration (FDA) does not determine safety standards for raw fish.
    • In order for seafood to be safe for consumption in sushi, it must be frozen at under -4°F for a significant enough time to have killed any parasites.
    • Although many markets are starting to carry Sashimi-grade fish, you should not assume that all fish from your local market has gone through the necessary steps to destroy parasites. Do not assume that fish is safe to eat raw unless it is clearly labeled as "Sashimi-Grade."
  • Two vegetables or other fillings
  • Short-Grained Rice
    • Typical long-grained rice used in many American dishes will not work for your sushi, as it will not take on the necessary, sticky consistency.
  • Rice Vinegar
    • For best results, use only Japanese rice vinegar.
    • There are several varieties of seasoned rice vinegar, often made with sake, that can be used if desired.
  • Nori
    • Nori is a thin sheet of seaweed, ideal for rolling sushi.
  • Ginger Root
    • The ginger served alongside sushi is pickled and sliced thinly. This is called "Gari".2
    • You can buy pre-made gari, or make it yourself from using rice vinegar, sugar, and ginger root.
    • Gari should be eaten between sushi courses to cleanse the palate.
  • Wasabi
    • Wasabi plants naturally grow only in certain river valleys of Japan. For this reason, buying fresh wasabi root can be quite expensive. In fact, there is a good chance that you have never tried real wasabi. The "wasabi" served typically at sushi restaurants is actually an imitation product made of horseradish and mustard seed.
  • Soy Sauce
    • Any common brand of soy sauce will work fine for your sushi.
    • Remember, do not pour the soy sauce over the sushi, and only dip it "fish-side-up".
                                                            Equipment:
  • Sharp Knife
    • Any standard kitchen knife, kept sharp, will do, though you may want to get a special sushi knife.
  • Bamboo Mat
    • Bamboo Mats are placed under your sushi and make it easier to roll. They can be purchased as part of a "sushi kit", which may also contain chopsticks, rice molds, and "how-to" books.
       Is looks pretty hard to make a "professional" Sushi. But is lot of Fun to make it rather than buy one ! Try it ! 

Read More  http://www.mahalo.com/how-to-make-sushi/

How to make Pancakes =)

The Best Pancake RecipeIngredients
1 ½ cups all-purpose flour
1 tablespoon baking powder
1 teaspoon salt
1 tablespoon granulated sugar
1 ¼ to 1 ½ cups milk
1 egg, lightly beaten
3 tablespoons melted butter or vegetable oil
1 teaspoon vanilla

Directions


First, gather all your ingredients together. Get the best quality ingredients you can, and make sure they are fresh. For example, if you have baking powder that’s been sitting in your cupboard for 5 years, you should get some new baking powder. It will lose its effectiveness over time. Whenever I’m making pancakes from scratch, I always make sure I have the ingredients on hand before starting to avoid extra trips to the grocery store.

Get a large bowl for the dry ingredients. Use a sifter or a fine sieve to sift the flour together with the baking powder, salt, and sugar. Do not skip the sifting step or else you’ll end up with very lumpy batter and dense pancakes. You can even sift the flour twice for extra fluffy pancakes. Stir the dry ingredients together lightly with a whisk to combine.

If you’re using melted butter, melt it completely and set it aside to cool slightly. Don’t let it harden again. I find that leaving the melted butter to sit for about 5 minutes is good. This is usually how long it takes for me to prepare the rest of the wet ingredients. Mix it together quickly with the egg, vanilla, and 1 ¼ cups milk with a whisk.

The next step will require limited, gentle stirring. If you mix together the wet and dry ingredients too much, the pancakes will become tough. Excessive stirring can overdevelop the gluten from the flour which creates the tough, chewy texture that is all wrong for good pancakes. They should be light and fluffy.

Slowly pour the wet ingredients into the dry ingredients, stirring gently with a wooden spoon. Sifting the flour will make sure there aren’t too many lumps, but there will be some. Stir the batter just until most of the lumps are gone. If you think the batter is too thick, add the extra milk. Some people like thin pancakes and others like them thick. I like to keep out the extra quarter cup of milk, but this is mostly a personal preference. Next, put the batter in the refrigerator for at least 15 to 30 minutes. This will help to relax some of the gluten and form lots of bubbles for fluffy pancakes. Some people even like to make the batter the night before.

While your pancake batter is resting, prepare your griddle. You can use any pan and they will be cooked, but a good pancake griddle is best. Look here for griddle recommendations. It will cook your pancakes evenly, brown them nicely, and make it easier to flip your pancakes. There are many cast iron griddles and electric griddles on the market. Choose one with low sides and a large enough surface area to cook as many pancakes as possible. The more you can cook at once, the sooner they are done. This ensures that the first batches aren’t cold by the time your done.

Heat the griddle to about medium high heat. Be sure to let it heat through all the way so your pancakes are golden brown and not dry inside. Lightly grease the griddle with brushed on vegetable oil or butter. Don’t put on too much or you’ll fry the pancakes. If you want crispy edges, a little more oil or butter will work great.

Remove the batter from the refrigerator, but do not stir it. Stirring will break up all the bubbles. When the griddle is ready, scoop about ¼ cup of batter and pour it onto the pan spacing the pancakes about 1 to 2 inches apart for easier flipping. You can make them larger or in different shapes if you want to.
Let the pancakes cook on the griddle for about 1 to 3 minutes until tiny bubbles have formed all across the top of the pancake. The bottom should be a nice golden brown color. Flip them over and continue to cook on the other side for 1 to 2 minutes or until golden brown.

Serve the pancakes immediately with your choice of topping. Traditionally, butter and syrup is used. It is delicious, but for an extra treat, you can try sliced fruit, flavored syrups, or other toppings. Experiment with different sweet and/or savory options. My favorite includes traditional pancakes served with butter, syrup, and breakfast sausage! 

Read More:  http://makepancakes.com/